Create your own certificates (OpenSSL under Windows/Linux) - LSM 3.6 SP1 Business + Prof.
This chapter provides examples of how to create all the files needed for secure communication with RouterNode 3 using own certificates.
In the example, a fictitious company name is used ("OpenAllDoors"). If necessary, adapt file names, configuration files and commands to own situation.
Please note:
- Supported key type: prime256v1: X9.62/SECG curve over a 256-bit prime body
- The certificate and key must be uploaded in DER format.
- The certificate files in DER format must not exceed 768 bytes. Your information about your company in the configuration files affects the size of the DER files.
- The self-signed CA device certificate (CustomDeviceCA.crt) must be installed on the client (computer) to verify the device certificate for the RouterNode 3. It is in PEM format and does not need to be converted.
- The self-signed CA client certificate (CustomClientCA.crt) is optional, but SimonsVoss recommends also installing this certificate on the client. Otherwise, the client cannot fully verify the certificates and displays a warning.
- To add the client certificate and the key to the Windows certificate store, both must be packaged as a PFX file.
This description is intended as an example only. SimonsVoss cannot help you create the certificates. If you have any questions, please contact your IT department.
OpenSSL on Windows operating systems (Win64 OpenSSL Command Prompt)
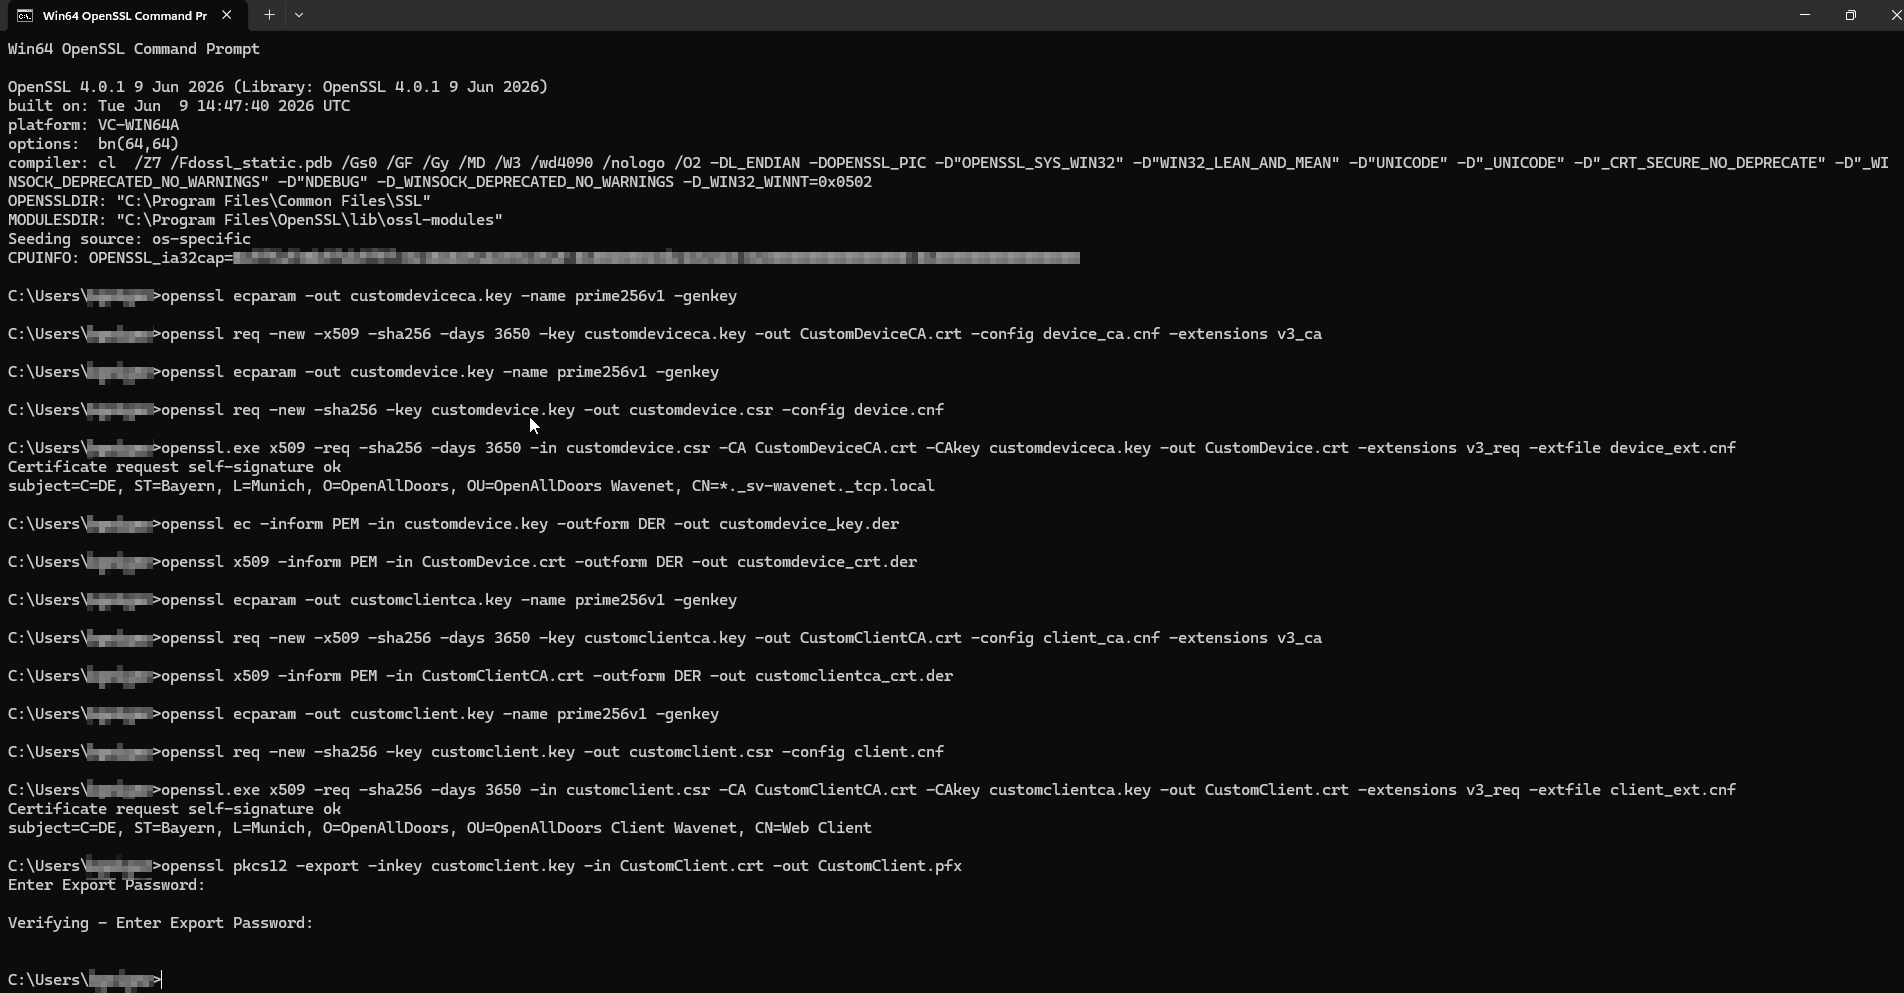
- OpenSSL 4.0 or above is installed.
- OpenSSL terminal opened.
- Create the private key for the self-signed CA device certificate:
openssl ecparam -out customdeviceca.key -name prime256v1 -genkey - Create a configuration file named device_ca.cnf (for content, see device_ca.cnf).
- Create the self-signed CA device certificate:
openssl req -new -x509 -sha256 -days 3650 -key customdeviceca.key -out CustomDeviceCA.crt -config device_ca.cnf -extensions v3_ca - Create the private key for the device certificate:
openssl ecparam -out customdevice.key -name prime256v1 -genkey - Create a configuration file named device.cnf (for content, see device.cnf).
- Create a device certificate signing request:
openssl req -new -sha256 -key customdevice.key -out customdevice.csr -config device.cnf - Create a configuration file named device_ext.cnf (for content, see device_ext.cnf).
- Create the CA-signed certificate:
openssl.exe x509 -req -sha256 -days 3650 -in customdevice.csr -CA CustomDeviceCA.crt -CAkey customdeviceca.key -out CustomDevice.crt -extensions v3_req -extfile device_ext.cnf - Convert the key to DER format:
openssl ec -inform PEM -in customdevice.key -outform DER -out customdevice_key.der - Convert the certificate to DER format:
openssl x509 -inform PEM -in CustomDevice.crt -outform DER -out customdevice_crt.der - Create the private key for the self-signed client CA certificate:
openssl ecparam -out customclientca.key -name prime256v1 -genkey - Create a configuration file named client_ca.cnf (for content, see client_ca.cnf).
- Create the self-signed client CA certificate:
openssl req -new -x509 -sha256 -days 3650 -key customclientca.key -out CustomClientCA.crt -config client_ca.cnf -extensions v3_ca - Convert the self-signed client CA certificate to DER format:
openssl x509 -inform PEM -in CustomClientCA.crt -outform DER -out customclientca_crt.der - Generate the private key for the client certificate:
openssl ecparam -out customclient.key -name prime256v1 -genkey - Create a configuration file named client.cnf (for content, see client.cnf).
- Create a signing request for the client certificate:
openssl req -new -sha256 -key customclient.key -out customclient.csr -config client.cnf - Create a configuration file named client_ext.cnf (for content, see client_ext.cnf).
- Create the CA-signed client certificate:
openssl.exe x509 -req -sha256 -days 3650 -in customclient.csr -CA CustomClientCA.crt -CAkey customclientca.key -out CustomClient.crt -extensions v3_req -extfile client_ext.cnf - Convert the client certificate and key to a PFX file:
openssl pkcs12 -export -inkey customclient.key -in CustomClient.crt -out CustomClient.pfx NOTE

Export password
The PFX file contains the confidential private key
customclient.key. OpenSSL therefore requires a password when creating the PFX file. You must enter this password if you want to add the certificates to Windows with the PFX file.
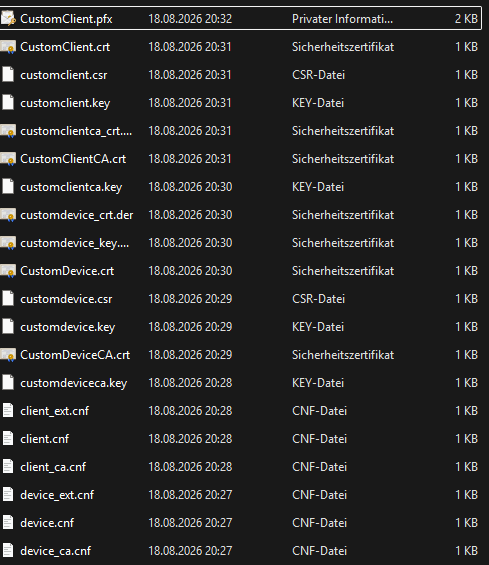
The following files should have been generated:
OpenSSL on Linux operating systems
- OpenSSL 4.0 or above is installed.
- OpenSSL terminal opened.
- Create the private key for the self-signed CA device certificate:
openssl ecparam -out customdeviceca.key -name prime256v1 -genkey - Create a configuration file named device_ca.cnf (for content, see device_ca.cnf).
- Create the self-signed CA device certificate:
openssl req -new -x509 -sha256 -days 3650 -key customdeviceca.key -out CustomDeviceCA.crt -config device_ca.cnf -extensions v3_ca - Create the private key for the device certificate:
openssl ecparam -out customdevice.key -name prime256v1 -genkey - Create a configuration file named device.cnf (for content, see device.cnf).
- Create a device certificate signing request:
openssl req -new -sha256 -key customdevice.key -out customdevice.csr -config device.cnf - Create the CA-signed certificate:
openssl x509 -req -sha256 -days 3650 -in customdevice.csr -CA CustomDeviceCA.crt -CAkey customdeviceca.key -out CustomDevice.crt -extfile <(printf "[v3_req]\\nsubjectAltName = @alt_names\\nbasicConstraints = CA:FALSE\\nsubjectKeyIdentifier = hash\\nauthorityKeyIdentifier = keyid\\nkeyUsage = digitalSignature,keyAgreement\\nextendedKeyUsage = serverAuth\\n[alt_names]\\nDNS.1 = *.local") -extensions v3_req - Convert the key to DER format:
openssl ec -inform PEM -in customdevice.key -outform DER -out customdevice_key.der - Convert the certificate to DER format:
openssl x509 -inform PEM -in CustomDevice.crt -outform DER -out customdevice_crt.der - Create the private key for the self-signed client CA certificate:
openssl ecparam -out customclientca.key -name prime256v1 -genkey - Create a configuration file named client_ca.cnf (for content, see client_ca.cnf).
- Create the self-signed client CA certificate:
openssl req -new -x509 -sha256 -days 3650 -key customclientca.key -out CustomClientCA.crt -config client_ca.cnf -extensions v3_ca - Convert the self-signed client CA certificate to DER format:
openssl x509 -inform PEM -in CustomClientCA.crt -outform DER -out customclientca_crt.der - Generate the private key for the client certificate:
openssl ecparam -out customclient.key -name prime256v1 -genkey - Create a configuration file named client.cnf (for content, see client.cnf).
- Create a signing request for the client certificate:
openssl req -new -sha256 -key customclient.key -out customclient.csr -config client.cnf - Create the CA-signed client certificate:
openssl x509 -req -sha256 -days 3650 -in customclient.csr -CA CustomClientCA.crt -CAkey customclientca.key -out CustomClient.crt -extfile <(printf "[v3_req]\\nbasicConstraints = CA:FALSE\\nsubjectKeyIdentifier = hash\\nauthorityKeyIdentifier = keyid\\nkeyUsage = digitalSignature\\nextendedKeyUsage = clientAuth") -extensions v3_req - Convert the client certificate and key to a PFX file:
openssl pkcs12 -export -inkey customclient.key -in CustomClient.crt -out CustomClient.pfx NOTE
Export password
The PFX file contains the confidential private key
customclient.key. OpenSSL therefore requires a password when creating the PFX file. You must enter this password if you want to add the certificates to Windows with the PFX file.