Assign IP address - Step-by-Step WO
You can assign the IP address statically or have it defined by a DHCP server.
Define the setting either via the configuration page (see Open configuration page) or with the OAM tool:
Choose between DHCP server or static IP. You can also make the settings described below in the browser interface (see Browser interface).
The procedure is described for RouterNodes. Use the same procedure for SmartIntego GatewayNodes and MobileKey SmartBridges.
Set IP for DHCP mode (default)
If you use a DHCP server, a DHCP server will configure the IP address.
- OAM tool available and unzipped.
- RouterNode connected to the network.
- Double-click on the executable file to launch the OAM tool.
- The OAM tool will open.
- Click the Refresh button.
- RouterNode’s IP address updated.
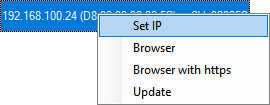
- Right-click the entry for the RouterNode’s IP address you want to update to open the context menu.
NOTE

Compare MAC
If you select the wrong RouterNode, you could assign the same IP address multiple times.
- Compare the MAC address of the entry with the label on your RouterNode.
- Click the entry.
- The Network configuration window will open.
- Make sure that the checkbox
 Enable DHCP is activated.
 - If no address reservation is provided for this RouterNode on the DHCP server, note down the hostname (e.g. SV_32205C). You will need it later when you carry out configuration in WaveNet Manager (see WaveNet manual - Add RouterNode to WaveNet).
- Click on the OK button.
- Network configuration window closes.
- RouterNode restarts.
- Close the reboot notification window.
- Close the OAM tool.
- DHCP mode is configured.
Configuring the IP for operation with static IP address
If you do not use a DHCP server, the IP address is configured with the default factory setting. You must change the IP address in this case; if you don't, several RouterNodes will have the same IP (i.e. the default factory IP) and will not be able to communicate.
- OAM tool available and unzipped.
- RouterNode connected to the network.
- Double-click on the executable file to launch the OAM tool.
- The OAM tool will open.
- Click the Refresh button.
- The RouterNode’s IP address is now updated.
- Right-click the entry for the RouterNode’s IP address you want to update to open the context menu.
NOTE
Compare MAC
If you select the wrong RouterNode, you could assign the same IP address multiple times.
- Compare the MAC address of the entry with the label on your RouterNode.
- Click the entry.
- The Network configuration window will open.
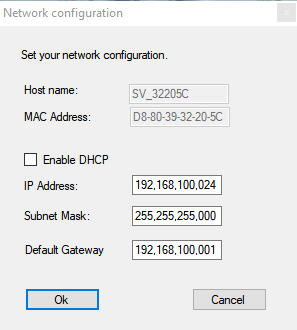
- Disable the
 Enable DHCP check box.
 - Enter a new IP address if required.
- Click on the OK button.
- Network configuration window closes.
- RouterNode restarts.
- Close the reboot notification window.
- Close the OAM tool.
- IP address is now configured.