Creating transponders for common locking level - AXM Classic
NOTE

Activating cards or transponders for a locking system
The only credential types available are those that have been activated in your locking system.
- If necessary, activate cards or transponders in the locking system properties (see Enable cards or transponders).
- AXM Classic open.
- List with transponders or matrix screen opened.
- Common locking level created and locking system assigned (see Creating a common locking level).
- Switch to a locking system that you have assigned to the common locking level.
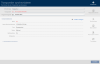
- Click on the
 button.
 - The window for creating an identification medium will open.
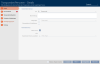
- Select the
 Master locking level checkbox.
 - Options for selecting the common locking level are displayed.
- tab disappears.
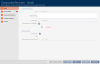
- Fill in the remaining options as for a normal transponder (see Creating transponders and cards).
- Click on the button.
- The window for creating a new identification medium closes.
- The transponder is created in all assigned locking systems.
- Since it belongs to a common locking level, it is displayed in the locking level colour (red in the example).
Transponder in the first locking system:
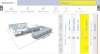
Transponder in the second locking system:

You can now authorise the transponder created in multiple locking systems at the different locking devices in the locking systems (see Authorising a transponder with common locking level).
After synchronisation is complete, the and fields are displayed in the common locking level colour (example: red).