Add RouterNode to WaveNet - WaveNet
If you want to use RouterNodes in your WaveNet, you must first import the RouterNodes into your WaveNet topology in the WaveNet Manager.
Option | Application situation |
|---|---|
| Use this option if you have many RouterNodes with Ethernet interface connected to the same network. They must be on the same subnet, otherwise use With this option, you do not have to determine each IP and then enter it manually. |
| Use this option to add RouterNodes without an Ethernet interface (see Transmission paths). Routers without an Ethernet interface do not have an IP address and can therefore only be found and added using the chip ID. |
| Use this option if you specifically want to add a RouterNode with Ethernet interface to your network. You must know the IP address (static / reserved) or the host name (DHCP). These can also be located in a different subnet. |
Find IP or USB router
- RouterNode connected to the network.
- WaveNet Manager opened via LSM (see Best Practice: From the LSM software)
- Right-click on the WaveNet_XX_X entry.
- The window Administration opens.
- Select the option
 Find IP or USB router.
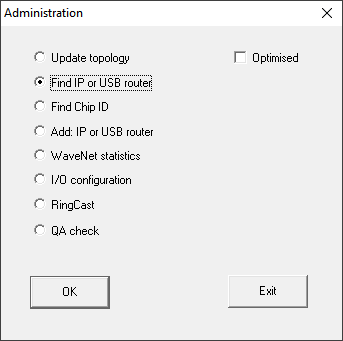
- Click on the OK button.
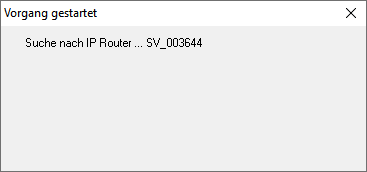
- The Administration window closes.
- The Procedure started window opens temporarily.
- The window Use host names? opens.
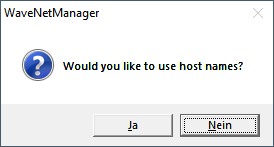
- If the router is connected via DHCP and you have a working name resolution in the network, confirm with the button Yes to use the host name. If you have connected the router using a static IP address, click the No.
- The window Use host names? closes.
- The window Network options opens.
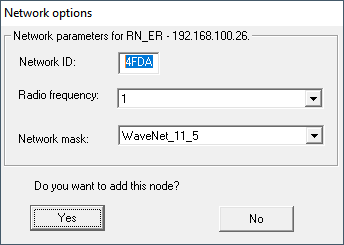
NOTE

Setting network parameters
If you set up a new WaveNet and add your first RouterNode, you can set network options here (see Addressing and Radio channel). After setting up your WaveNet, you can no longer change these settings without resetting your WaveNet devices.
- Click on the Yes button.
- The Network options window closes.
- Click on the button Save.
- RouterNode is added and listed. All other unconfigured RouterNodes are automatically added.
Find Chip ID
- RouterNode connected to the network.
- Chip ID of the RouterNode still to be configured known.
- WaveNet Manager is open.
- Right click the entry WaveNet_XX_X.
- The window Administration opens.
- Select the option Find Chip ID.
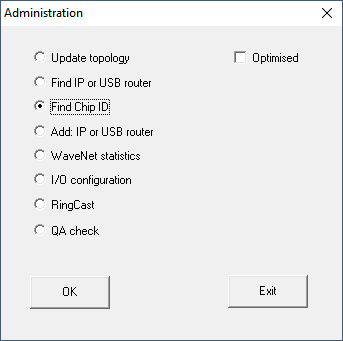
- Click on the OK button.
- The Administration window closes.
- The window Search for node opens.
- Enter the chip ID.
- Click on the button Start.
- The window Search for node closes.
- The window Procedure started opens temporarily.
- Add the RouterNode.
- RouterNode is listed.
- Click on the button Save.
- RouterNode is added.
Add: IP or USB router
- RouterNode is connected to the network.
- The IP of the RouterNode is known (see Determining and setting the IP address).
- WaveNet-Manager opened.
- Right click the entry WaveNet_XX_X.
- The window Administration opens.
- Select the option Add: IP or USB router.
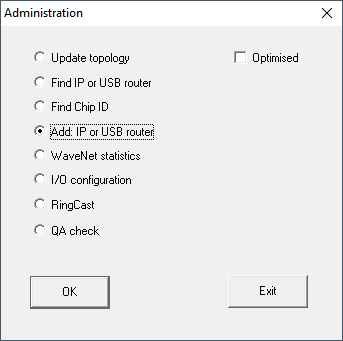
- Click on the OK button.
- The Administration window closes.
- The window Add: IP or USB Router opens.
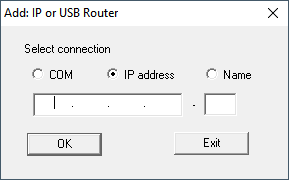
- Select the option IP address.
- Enter the IP address of your RouterNode.
NOTE
IP range
You can specify a range of IP addresses. For example, if you use 192.168.100.XX to 192.168.100.YY, enter the first IP address of your range (192.169.100.XX) and the extension of the last IP address (YY). The WaveNet Manager will then add any router nodes it finds in this range.
- Click on the OK button.
- The window Add: IP or USB Router closes.
- The window Network options opens.
NOTE
Setting network parameters
If you set up a new WaveNet and add your first RouterNode, you can set network options here (see Addressing and Radio channel). After setting up your WaveNet, you can no longer change these settings without resetting your WaveNet devices.
- Click on the Yes button.
- The Network options window closes.
- Click on the button Save.
- RouterNode is added and listed.