RouterNode: Digital input - WaveNet
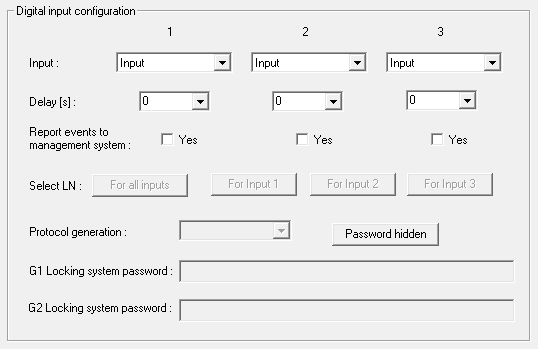
In the dropdown list , you can set how the LockNodes of the RouterNode should react to a signal applied to the respective RouterNode input. (= applied voltage is higher than the fixed reference voltage).
Comparison voltages (RN and RN2) | |
|---|---|
<0,9 VDC | LOW (no signal) |
>2.1 VDC | HIGH (signal) |
Input | Standard entry. The RouterNode does not respond to an applied signal. However, you can forward the signal changes to LSM. |
Block lock | If a signal is present at the input (input event, level change low to high), the RouterNode sends a broadcast to all LockNodes. You can set whether the LockNodes should respond to the broadcast (see LockNode). The LockNodes then deactivate the locking devices in which they are installed for the duration of the input event. They then no longer react to authorised identification media, no access is possible. When the signal is no longer present (= no input event, level change from high to low), the locks are reactivated. If you apply a signal to the input by an intrusion alarm system during arming, you can thus deactivate the locks of the outer shell for the duration of the arming of the alarm system (and prevent the unintentional triggering of the alarm system). However, you can also freely choose which locks you want to deactivate. With the outputs (see RouterNode: Digital output) you can send an acknowledgement back to the intrusion alarm system after successful deactivation. Using this function is not VdS-compliant. |
Amok function | Similar to the block lock function: If a signal is applied to the input (level change Low to High), the RouterNode sends a broadcast to all LockNodes. You can set whether the LockNodes should respond to the broadcast (see LockNode). If there is a signal at the input, the RouterNode sends a broadcast to all LockNodes which should react to the input. They then reject all identification media (even normally authorised ones); one-time access is only possible with special identification media (red level). They then reject all identification media (even normally authorised ones), no access is possible. You must explicitly reactivate the locks with an activation command:
If you connect an emergency button to an input (see Input (button)) and connect it to the amok function, then you can use the emergency button to block all locks that have been reached and prevent people from entering (or in the case of a freely rotating cylinder, from leaving) rooms until they are explicitly reactivated. |
Emergency release | Opposite to the gunman attack function: If a signal is applied to the input (level change Low to High), the RouterNode sends a broadcast to all LockNodes. You can set whether the LockNodes should respond to the broadcast (see LockNode). This broadcast permanently couples all locks in which the LockNodes are installed. The locks remain coupled even after the end of the input event. You must end the emergency release of the locks with a remote opening command (the locks uncouple immediately after the remote opening command has been received):
If you apply a signal to the input through a fire alarm system (see Application examples), then you can open all locking devices to enable emergency services to access them. |
Remote opening | If a signal is applied to the input (level change Low to High), the RouterNode sends a broadcast to all LockNodes. You can set whether the LockNodes should respond to the broadcast (see LockNode). This broadcast carries out a remote opening. The locking device couples for the pulse duration set in the LSM (pulse opening). This also applies to locking devices in flip-flop operation. |
Activation | If a signal is applied to the input (level change Low to High), the RouterNode sends a broadcast to all LockNodes. You can set whether the LockNodes should respond to the broadcast (see LockNode). This broadcast activates the locks in which the LockNodes are installed. You can then reuse locks that were previously deactivated. This response only works with I/O RouterNodes of type RN2 from firmware version 40.8 onwards together with WaveNet Manager version 2.6.6 or later. |
NOTE

Permanent emergency opening
A fire can damage the input cable or other parts. This would cause the locking devices to close again even though there is a fire. Persons could be locked up in the fire zone and rescue units could be prevented from entering.
Therefore, all locking devices stay in the emergency opening state (and thus passable) until an explicit remote opening command closes the locking devices again.
If you define a response to an event, you must make additional specifications.
- Select the LockNodes that are to react.
- Specify the protocol generation (G1, G1+G2, G2) as entered in the locking system settings.
- Specify the locking system password.
A signal applied to the input is an input event and can also be switched by the built-in relay, see in RouterNode: Digital output. If the RouterNode has reacted to the input event and, for example, has performed a broadcast, it can thus switch the relay as confirmation.
In the drop-down list, you can set how long the RouterNode should wait until the corresponding input responds to an event.
0 s | Standard entry: The input reacts immediately to an event. |
8 s | The input reacts to an event after 8 seconds |
16 s | The input reacts to an event after 16 seconds. |
24 s | The input reacts to an event after 24 seconds. |
32 s | The input reacts to an event after 32 seconds. |
RingCast | An event at the input triggers a RingCast (see RingCast). |
Forward triggering events to the LSM
You can use the checkbox ![]() Report events to management system to set whether the signals (input events) at the respective input are to be forwarded to LSM. In LSM, you can (additionally) use the event manager to react to these events.
Report events to management system to set whether the signals (input events) at the respective input are to be forwarded to LSM. In LSM, you can (additionally) use the event manager to react to these events.
Not all events are forwarded (see table):
Response | Forwardable signals (events) |
|---|---|
|
|
|
|
Only events that have the responses Input oder Block lock are forwarded to the LSM. All other events are not forwarded to the LSM.
Select LockNodes for response
You can use the Select LN to set which LockNodes perform the set reaction. You have two options for setting:
(Different) settings for individual inputs of the RouterNode | Same setting for all inputs of the RouterNode |
|---|---|
Click on the button of the respective input (For Input 1, 2 or 3). The window of the input opens. Select the LockNodes that should react to the events of this input. Proceed in the same way for the other inputs. LockNodes marked here react to all events at this input. You carry out the response that you have defined for this input. | Click the button For all inputs and select the LockNodes. LockNodes marked here react to all events at the inputs. They execute the response that you have defined for the relevant input. |
The following example illustrates the behavior depending on the setting:
For events at inputs 1 and 2, Remote opening is assumed as the response.
Example for settings | ||||
|---|---|---|---|---|
All inputs | Input 1 | Input 2 | Input 3 | |
LockNode 1 | ✔ | |||
LockNode 2 | ✔ | |||
LockNode 1 reacts to all events. LockNode 2 only reacts to events of input 1. In other words: a keystroke on Input 1 will give a remote open command to all locking devices. By pressing a key on Input 2, only the locking device with LockNode 1 receives a remote opening command. | ||||
Alternatively, you can also set directly at the LockNodes whether they perform reactions (see LockNode).
You use the drop-down menu to specify the protocol generation of the locking system.
The LockNodes address the locking devices with the locking system password. You should therefore enter your locking system password.
Click the button Password hidden, to prevent your password from being displayed in plain text during entry.