LockNode - WaveNet
- WaveNet Manager opened via LSM (see Best Practice: From the LSM software)
- LockNodes reachable (see Testing accessibility (WaveNet)).
- Right-click on the entry of the LockNode whose IO configuration you want to change.
- Window I/O configuration opens (window and settings version-dependent, picture is an example).
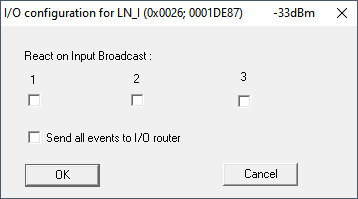
- You can set the IO configuration.
Activate reactions
If the RouterNode detects an input event at one of its digital inputs and a reaction is set (see RouterNode: Digital input), then the RouterNode transmits for a broadcast. You use the upper row of checkboxes to individually specify for each of the three inputs whether the selected LockNode reacts to the broadcast caused by the event at the respective input.
Alternatively, you can activate the reaction for several LockNodes at the same time. Open the IO configuration menu of the RouterNode (see RouterNode: Digital input).
Activate event forwarding
The RouterNode can
- react to certain events (see RouterNode: Digital output)
- and/or forward these events to LSM.
You can set whether the LockNode forwards the events to the RouterNode directly at the LockNode. Activate the checkbox ![]() Send all events to I/O router, to forward all events to the RouterNode. You can respond to these events either with the RouterNode (see RouterNode: Digital output) or in the LSM.
Send all events to I/O router, to forward all events to the RouterNode. You can respond to these events either with the RouterNode (see RouterNode: Digital output) or in the LSM.
Alternatively, you can activate event forwarding for several LockNodes of a RouterNode at the same time. Open the IO configuration menu of the RouterNode (see RouterNode: Digital output).