Determining and setting the IP address - WaveNet
With the Operation, Administration and Maintenance Tool (OAM tool) you can both read and set the IP address. The OAM tool is available free of charge in the download area of the SimonsVoss website (![]() https://www.simons-voss.com). You do not need to install the OAM tool.
https://www.simons-voss.com). You do not need to install the OAM tool.
IMPORTANT
Unauthorised changing of the IP address
The OAM tool is freely accessible. The OAM tool can be misused by unauthorized persons to change the IP address of your RouterNodes, GatewayNodes or SmartBridges.
- Block changing the IP address in the OAM Tool via the browser interface (see Browser interface).
NOTE

Unauthorised access with standard access data
The standard access data can be viewed freely. Unauthorised persons cannot change the access authorisations, but they can change the network configuration. You will then no longer be able to reach the device via the network and will have to reset it.
Some browsers do not transmit spaces at the beginning of the password.
- Change the default password.
- Do not start or end the password with spaces.
Determining the IP
NOTE
Error when connecting to several networks at the same time
The OAM tool searches the network for SimonsVoss network devices. Computers can be connected to several networks (e.g. cable and WiFi). In such a case, it is not clear to the OAM tool which network is to be searched and not all SimonsVoss network devices may be found.
- Disconnect network connections that are not needed.
- Only connect the computer to the network that contains the network devices.
The procedure is described for RouterNodes. Use the same procedure for SmartIntego GatewayNodes and MobileKey SmartBridges.
- OAM tool available and unzipped.
- RouterNode connected to the network.
- Subnet known.
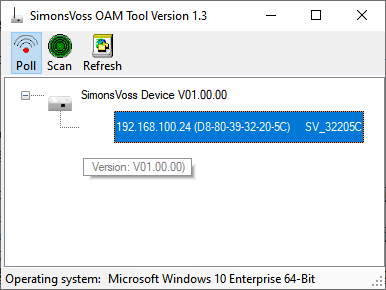
- Double-click on the executable file to launch the OAM tool.
- The OAM tool will open.
- Click the Scan button.
- The Scan window will open.
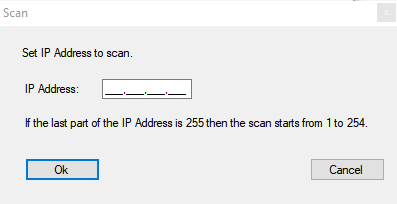
- Enter a known IP address of a device in the (WaveNet) network (other or new devices will also be found. If you do not know an IP address, then use the following IP address: 192.168.100.255 - may differ depending on the subnet).
- Click on the OK button.
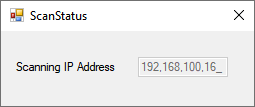
- Scan window closes.
- OAM tool scans the address range.
- OAM tool displays detected devices in the list.
Choose between DHCP server or static IP. You can also make the settings described below in the browser interface (see Browser interface).
The procedure is described for RouterNodes. Use the same procedure for SmartIntego GatewayNodes and MobileKey SmartBridges.
Set IP for DHCP mode (default)
If you use a DHCP server, a DHCP server will configure the IP address.
- OAM tool available and unzipped.
- RouterNode connected to the network.
- Double-click on the executable file to launch the OAM tool.
- The OAM tool will open.
- Click the Refresh button.
- RouterNode’s IP address updated.
- Right-click the entry for the RouterNode’s IP address you want to update to open the context menu.
NOTE
Compare MAC
If you select the wrong RouterNode, you could assign the same IP address multiple times.
- Compare the MAC address of the entry with the label on your RouterNode.
- Click the entry.
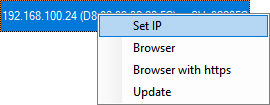
- The Network configuration window will open.
- Make sure that the checkbox
 Enable DHCP is activated.
 - If no address reservation is provided for this RouterNode on the DHCP server, note down the hostname (e.g. SV_32205C). You will need it later when you carry out configuration in WaveNet Manager (see WaveNet manual - Add RouterNode to WaveNet).
- Click on the OK button.
- Network configuration window closes.
- RouterNode restarts.
- Close the reboot notification window.
- Close the OAM tool.
- DHCP mode is configured.
Configuring the IP for operation with static IP address
If you do not use a DHCP server, the IP address is configured with the default factory setting. You must change the IP address in this case; if you don't, several RouterNodes will have the same IP (i.e. the default factory IP) and will not be able to communicate.
- OAM tool available and unzipped.
- RouterNode connected to the network.
- Double-click on the executable file to launch the OAM tool.
- The OAM tool will open.
- Click the Refresh button.
- The RouterNode’s IP address is now updated.
- Right-click the entry for the RouterNode’s IP address you want to update to open the context menu.
NOTE
Compare MAC
If you select the wrong RouterNode, you could assign the same IP address multiple times.
- Compare the MAC address of the entry with the label on your RouterNode.
- Click the entry.
- The Network configuration window will open.
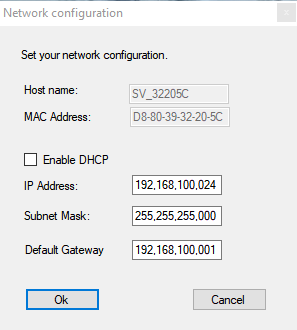
- Disable the
 Enable DHCP check box.
 - Enter a new IP address if required.
- Click on the OK button.
- Network configuration window closes.
- RouterNode restarts.
- Close the reboot notification window.
- Close the OAM tool.
- IP address is now configured.