Batteries - Locking cylinder (Z4) DoorMonitoring
Battery life
The battery life depends on the DM Cylinder configuration settings and the use behaviour. The following affect the battery life:
- The fastening screw sampling interval
- Number of activations
- Reading the access list
- Changes to programming
- Number of tasks
The number of activations totals up to 50,000.
The battery life depends on the fastening screw setting:
Sampling interval | Battery lifetime |
|---|---|
0.2s | 2.5 years |
2s | 4 years |
3s | 4.5 years |
The battery life indicated serves as a guide. A battery warning is not emitted when the aforementioned service life expires, but is based on the measured battery capacity instead.
Battery warning levels
Warning Level 1 | Warning Level 2 | Freeze mode |
|---|---|---|
8 short audible signals before engaging | Eight short audible signals 30 seconds long with one second pause each time before engaging | 6 audible signals (long – pause – short) |
Up to 15,000 access events or up to 9 months on standby | Up to 50 access events or up to 30 days | Battery change: activate with battery replacement transponder |
NOTE

The cylinder's monitoring function is deactivated from Warning Level 2. Changes to the cylinder status are not logged or transmitted.
Once Warning Level 2 has been emitted for the first time, the door can be opened with a transponder around 50 times. After reaching this number of opening operations or after about 4 weeks, the cylinder automatically switches to freeze mode. In freeze mode, the cylinder can only be replaced using a battery replacement transponder in conjunction with an authorised transponder.
Freeze mode
The locking device switches to freeze mode if Battery Warning Levels 1 and 2 have not been observed or the locking system administrator has not been informed of the battery warning. User transponders can no longer activate the locking device to prevent the battery from being fully discharged in this status.
NOTE
A door can only be opened with a battery replacement transponder once in freeze mode.
Normal transponders can no longer open a door
- Replace the batteries immediately after the first warning level starts
Battery replacement
- You have a battery replacement key
- You have a battery replacement transponder
- You have new battery replacement batteries
- You have an authorised transponder
- If the cylinder is in freeze mode, activate the battery replacement transponder
- The cylinder can now be opened with an authorised transponder
- Activate the authorised transponder
- Replace the batteries
- Activate the battery replacement transponder
- Freeze mode is permanently eliminated. The cylinder can be operated as normal
Replacing batteries
- Place the installation/battery key on the inside thumb-turn in such a way that the two teeth lock into the openings in the locking disc; if necessary, turn the thumb-turn until both teeth engage into the locking disc. Important: The tool must be placed flat on the inside front surface of the recessed grip ring to ensure that the installation tool can engage into the locking disc. . Use clean gloves free of fat or grease to handle new batteries.
- Hold the inside thumb-turn firmly and carefully turn the installation/battery key about 30° in a clockwise direction until you hear a click.
- Remove installation/battery key from the thumb-turn
- Push recessed grip ring backwards towards the door, so that it comes away from the thumb-turn
- Hold recessed grip ring firmly and turn thumb-turn about 10° in an anti-clockwise direction and remove
- Carefully remove both batteries from the holder
- Insert the new batteries into the holder at the same time with the positive poles next to each other; change the batteries as quickly as possible
NOTE
Always insert button cells with the positive poles next to each other
The batteries will only offer their full service life if they are installed correctly
NOTE
Batteries will corrode if they come into contact with sweat or grease
Batteries will lose their capacity before time
Corroded batteries may permanently damage the cylinder
- Never touch batteries with your bare hands
- You must wear clean gloves free of fat or grease to handle new batteries
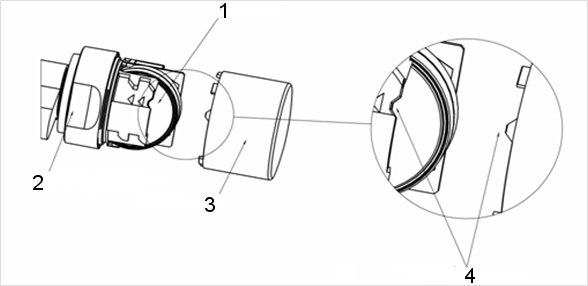
- Replace the thumb-turn (align the triangle mark as in the diagram[4]), hold the recessed grip firmly (see diagram) and fasten the inside thumb-turn by turning in a clockwise direction about 10°
- Push recessed grip ring back onto the thumb-turn, so that the thumb-turn and ring close together in a flush fit
- Place the installation/battery key on the inside thumb-turn in such a way that the two teeth lock into the openings in the locking disc; if necessary, turn the thumb-turn until both teeth engage into the locking disc
- Close the thumb-turn again by turning it about 30° in a clockwise direction until you hear a click
- Then activate an authorised transponder and check that it functions