Setting up SmartBridges - SmartBridge
This how you add a new SmartBridge to the web app:
- Click on the menu button
 .
. - Menu opens.
- Click on the button
 NETWORK.
 - The network view opens.
- Add a new SmartBridge using the
 button on SmartBridges.
 - Dialogue for adding a new SmartBridge starts.
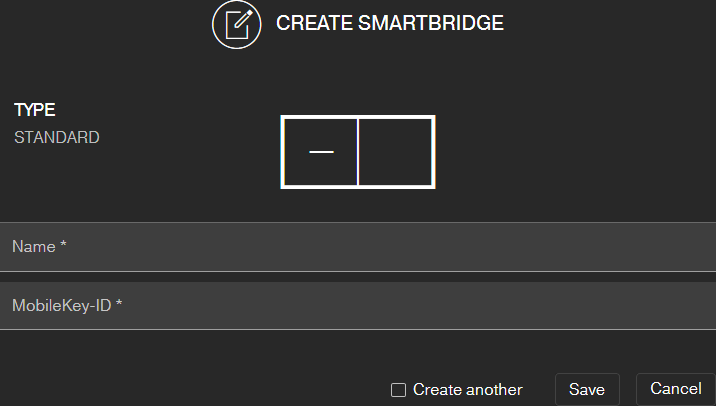
- Assign a unique name (e.g. "SmartBridge Office 2").
- Enter the MobileKey ID (see packaging or back of the SmartBridge, format XXXX-XXXX-XXXX-XXXX).
- If you want to create another PIN code keypad, select the checkbox
 Create another.
 - With this checkbox you remain in this view after saving and can immediately create another SmartBridge
- Click on the button SAVE.
- SmartBridge is created.
NOTE

SmartBridge connection to server
Your SmartBridge connects to the server approximately every 15 seconds. If you start the network configuration immediately after setting up the SmartBridge, the server cannot yet identify the SmartBridge and the network configuration fails.
- After setting up the SmartBridge, wait about twenty seconds before starting the network configuration.
Changing the default password
NOTE
Unauthorised access with standard access data
The standard access data can be viewed freely. Unauthorised persons cannot change the access authorisations, but they can change the network configuration. You will then no longer be able to reach the device via the network and will have to reset it.
Some browsers do not transmit spaces at the beginning of the password.
- Change the default password.
- Do not start or end the password with spaces.
Change the default password of your SmartBridge:
- Use the OAM tool to determine the IP address of your SmartBridge.
- Call up the web interface of your SmartBridge with a browser (user name: SimonsVoss, password: SimonsVoss).
- Assign a new password.
For detailed information about the OAM tool and your SmartBridge, please refer to the OAM Tool Manual, the quick guide for your SmartBridge and the SmartBridge manual.